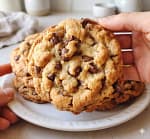
Crispy Chicken Katsu
Noodle Bowl
Golden panko-crusted chicken · saucy rice noodles · fried edamame · spicy Kewpie mayo — all in 30 minutes.
Jump To
If you only make one noodle bowl this season, make it this one. Crispy Chicken Katsu Noodle Bowls deliver everything you want on a busy weeknight — deep golden crunch, savory-sweet saucy noodles, a satisfying hit of umami, and that drizzle of creamy spicy mayo that ties it all together.
The beauty of this recipe? You cook everything in a single skillet. The panko-crusted chicken goes in first, then without washing the pan, you toss in the edamame and noodles with the sauce. All that golden fond from the chicken? It becomes part of the sauce. It’s the kind of effortless technique that makes a dish taste like you spent hours on it.
This recipe is inspired by Japanese chicken katsu — a dish typically served over rice with tangy tonkatsu sauce. Here, we swap the rice for silky rice noodles, add saucy depth with Japanese BBQ sauce and chili crunch, and finish with a spicy Kewpie mayo that you’ll want to put on everything.
Why You’ll Love This Recipe
- Done in 30 minutes — weeknight-approved, no shortcuts on flavor
- One pan — less cleanup, more flavor layering
- Restaurant-quality crunch — the panko + sesame seed crust is next level
- Deeply customizable — swap the protein, add veggies, adjust the heat
- Crowd-pleaser — works for family dinners, meal prep, or entertaining
Ingredients
For 4 servings · See substitutions below
The Sauce
- 2/3 cup tamari or soy sauce
- 1/4 cup Japanese BBQ sauce (like Bachan’s or Bulldog)
- 1 tablespoon honey
- 1 tablespoon chili crunch oil
- 2 teaspoons freshly grated ginger
The Chicken & Breading
- 4 chicken cutlets (or 2 boneless breasts, sliced horizontally)
- 2 cups Panko breadcrumbs
- 1/4 cup sesame seeds (white or mixed)
- Neutral oil for pan-frying (avocado or canola)
The Noodle Bowl
- 1 bag (10 oz) frozen shelled edamame
- 8 oz rice noodles — vermicelli or stir-fry style, cooked to package instructions
- Pickled ginger, sliced green onions, crumbled nori sheets — for topping
Spicy Kewpie Mayo
- 1/3 cup Kewpie mayo (Japanese mayo — richer and slightly sweeter than regular)
- 1–2 tablespoons sriracha or your favorite hot sauce
- 1–2 tablespoons Japanese BBQ sauce
Ingredient Substitutions
Don’t have everything on the list? Here are the best swaps:
How to Make Crispy Chicken Katsu Noodle Bowls
Total time: 30 minutes · Prep: 10 min · Cook: 20 min
Make the Sauce
In a medium bowl, whisk together the soy sauce, Japanese BBQ sauce, honey, chili crunch oil, and freshly grated ginger. The sauce should smell deeply savory with a hint of sweetness — taste it and adjust honey or heat to your liking. Spoon 2–3 tablespoons over the chicken cutlets and let them sit while you prep the breading. Reserve the rest for the noodles — don’t lose that bowl.
Bread the Chicken for Maximum Crunch
Combine Panko and sesame seeds in a shallow bowl or baking dish. Lay each chicken piece in the mixture and use your fist to press the crumbs firmly into both sides. Don’t be shy — really pack them in. This “pound-in” technique is the secret to crumbs that stick and crisp up without falling off in the pan.
Pan-Fry to Golden Perfection
Heat a few tablespoons of neutral oil in a large skillet over medium-high heat. The oil is ready when a Panko crumb dropped in sizzles immediately. Add the chicken in a single layer — don’t crowd the pan or you’ll steam instead of fry. Cook for 3–4 minutes per side until deeply golden and cooked through (internal temp: 165°F / 74°C). Transfer to a cutting board to rest.
Build the Saucy Noodles (Same Pan!)
Do not wash the skillet. Those golden bits left behind are pure flavor. Add the frozen edamame directly to the pan and cook over medium heat, stirring, until heated through and any moisture has evaporated (about 2–3 minutes). Add the cooked, drained rice noodles and pour in all the reserved sauce. Toss everything together until the noodles are evenly coated, glossy, and soaking up all that savory goodness. Remove from heat.
Mix the Spicy Kewpie Mayo
Combine the Kewpie mayo, sriracha, and BBQ sauce in a small bowl. Stir until smooth. Start with 1 tablespoon of sriracha and taste — add more for extra heat. This sauce is creamy, tangy, slightly sweet, and deeply addictive. Make a double batch and keep it in your fridge for the week.
Assemble & Serve
Slice the rested chicken into thin strips against the grain — this keeps it tender and makes for a beautiful presentation. Divide the saucy noodles into bowls. Top with sliced katsu chicken, a few pieces of pickled ginger, a generous scatter of green onions, and crumbled nori sheets. Finish with a heavy drizzle of spicy mayo. Serve immediately while the chicken is still crispy.
Pro Tips for the Crispiest Chicken Katsu
Storage & Meal Prep
Fridge
Store noodles and chicken separately. Both keep up to 4 days.
Freezer
Breaded uncooked chicken freezes well up to 3 months. Cook from frozen, add 3 min.
Reheat
Air fryer at 375°F for 5 min (chicken) and microwave or skillet for noodles.
Nutrition Per Serving
Estimated values. Actual nutrition varies with specific brands and portion sizes.